We'll walk you through some simple steps to get accurate delay functions in an AVR in C.
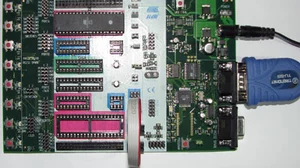
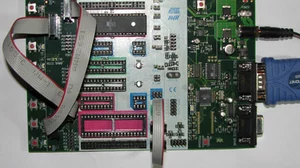
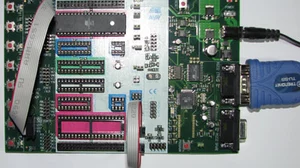
STK500 Setup
Make sure that you have your PORTA jumpered to LEDs, as was discussed in our Port Output guide.
The Delay Header
In order to use the built in delay features in WinAVR you need to include the delay header like this:
#include <util/delay.h>After including that header you can call the _delay_ms() function and pass it the number of milliseconds that you want to delay. To delay for 1 second, or 1000 milliseconds, call it like this:
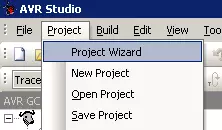
_delay_ms(1000);The delay functions rely on F_CPU being set, so be sure you told AVRStudio what speed of chip you are targeting, as is discussed in this guide. Here is a complete example of the above concepts, ready to be pasted in to your AVRStudio and compiled.
// ********************************************************************************
// Includes
// ********************************************************************************
#include <avr/io.h>
#include <stdbool.h>
#include <util/delay.h>
// ********************************************************************************
// Main
// ********************************************************************************
int main(void) {
uint8_t value = 0;
ÃÂ
ÃÂ ÃÂ ÃÂ ÃÂ // configure PORTA as output
ÃÂ ÃÂ ÃÂ ÃÂ DDRA = 0xFF;
ÃÂ
ÃÂ ÃÂ ÃÂ ÃÂ // main loop
ÃÂ ÃÂ ÃÂ ÃÂ while (true) {
ÃÂ ÃÂ ÃÂ ÃÂ ÃÂ ÃÂ ÃÂ ÃÂ // turn on every other bit on PORTA, pattern 10101010
ÃÂ ÃÂ ÃÂ ÃÂ ÃÂ ÃÂ ÃÂ ÃÂ PORTA = ~value++;
_delay_ms(1000);
}
}You can download the complete source code here.
Go Ahead, Compile It
You should be able to copy and paste this code directly into your AVRStudio and hit the Build Active Configuration button (it looks like a white bin with 2 blue down arrows, or press F7). For me, this code compiles to 184 bytes. When you download this code to your STK500 you should see the LEDs lighting up in a binary counting pattern, with 1 second of delay between each change. There is one line in there that you might find confusing.
PORTA = ~value++;This line takes value and inverts it, since the LEDs on the STK500 are wired in negative logic. After assigning the negated value to PORTA, the ++ operator increments value by one. ++ after a variable is called postincrement. If the ++ was before value then it would be called preincrement and the the increment would happen before value was negated and assigned to PORTA.
The Big Gotcha with _delay_ms
Be careful when using _delay_ms. If you pass the function a variable instead of a number, then the floating point math routines are going to get linked in to your program making it over 2,000 bytes bigger. For some chips, that's more than how much flash memory you have. The solution to this gotcha is to write a wrapper function that accepts variables, and then calls _delay_ms (1) (that's delay 1ms) as many times as you asked it to in your variable. Your wrapper function might look something like this:
// this wrapper function calls _delay_ms with a known value of 1
// if you call _delay_ms(variable) then the floating point library
// is going to be included and your output file gets much larger
void delay_1ms(uint16_t ms) {
    uint16_t i;
    for(i=0;i<ms;i++) _delay_ms(1);
}
This way we are always calling _delay_ms (1) and never passing it a variable. Then you can call your wrapper functions like this:
delay_1ms(mydelay);The only downside to this method is that your delays are no longer as accurate because you have the overhead of the function call and the for loop taking up processing cycles.
Smaller Delays
WinAVR also comes with _delay_us () that you can call for very short delays. Keep in mind that if you use a wrapper function with a delay as short as 1uS, then the overhead becomes larger than the delay you are asking for. It is best to call _delay_us () directly and just make sure to never pass it a variable.
Now we are going to have the speed of the delay stored in a variable, and we are going to have SW0 cause the delay to get shorter and SW1 cause the delay to get longer. We'll also add a bounds check to make sure that the delay never gets lower than 0, and a software switch debounce so that the custom delay changes in one increment each time the button is pressed.
// ********************************************************************************
// Includes
// ********************************************************************************
#include <avr/io.h>
#include <stdbool.h>
#include <util/delay.h>
// ********************************************************************************
// Function Prototypes
// ********************************************************************************
void delay_1ms(uint16_t ms);
ÃÂ
// ********************************************************************************
// Main
// ********************************************************************************
int main(void) {
uint8_t value = 0;
uint16_t mydelay;
mydelay=50;
ÃÂ
ÃÂ ÃÂ ÃÂ ÃÂ // configure PORTA as output
ÃÂ ÃÂ ÃÂ ÃÂ DDRA = 0xFF;
ÃÂ
ÃÂ ÃÂ ÃÂ ÃÂ // configure PORTB as input
ÃÂ ÃÂ ÃÂ ÃÂ DDRB = 0;
ÃÂ ÃÂ ÃÂ ÃÂ // // make sure it is high impedance and will not source
ÃÂ ÃÂ ÃÂ ÃÂ PORTB = 0;
ÃÂ
ÃÂ
ÃÂ ÃÂ ÃÂ ÃÂ // main loop
ÃÂ ÃÂ ÃÂ ÃÂ while (true) {
ÃÂ ÃÂ ÃÂ ÃÂ ÃÂ ÃÂ ÃÂ ÃÂ // PORTA increments in binary count pattern
ÃÂ ÃÂ ÃÂ ÃÂ ÃÂ ÃÂ ÃÂ ÃÂ PORTA = ~value++;
delay_1ms(mydelay);
ÃÂ
if(bit_is_clear(PINB,PB0)) {
if(mydelay > 50) mydelay-=25;
ÃÂ ÃÂ ÃÂ ÃÂ ÃÂ ÃÂ ÃÂ ÃÂ ÃÂ ÃÂ ÃÂ ÃÂ // wait for user to let go of switch, software debounce
ÃÂ ÃÂ ÃÂ ÃÂ ÃÂ ÃÂ ÃÂ ÃÂ ÃÂ ÃÂ ÃÂ ÃÂ while(bit_is_clear(PINB,PB0)) _delay_ms(1);
}
ÃÂ
if(bit_is_clear(PINB,PB1)) {
if(mydelay < 5000) mydelay+=25;
ÃÂ ÃÂ ÃÂ ÃÂ // wait for user to let go of switch, software debounce
while(bit_is_clear(PINB,PB1)) _delay_ms(1);
}
}
}
ÃÂ
// this wrapper function calls _delay_ms with a known value of 1
// if you call _delay_ms(variable) then the floating point library
// is going to be included and your output file gets much larger
void delay_1ms(uint16_t ms) {
uint16_t i;
for(i=0;i<ms;i++) _delay_ms(1);
}You can download the complete source code here.
When you first launch this program, the value in mydelay is 50, so delay_1ms (50) loops 50 times calling _delay_ms (1).
If you press SW0, then PB0 in PINB will go low.The macro bit_is_clear (PINB,PB0) will go true, and the if block will execute.
The first thing that happens is mydelay gets decremented by 25.
After that, we enter a while loop that waits for you to let go of SW0. When you let go, the code continues on in the main loop.
This way each press of SW0 (orSW1 for that matter) only causes a single increment or decrement of mydelay. This is a sort of software switch debounce.
If it wasn't there, then pressing SW1 would cause the value of mydelay to increment up to it's max value faster than you could take your finger off of the button.
Continue on to our next guide which introduces interrupts using the AVR Timer interrupt. Or head back to our index of AVR Guides here.