If you want to write your AVR programs in C, then WinAVR is a great, free way to get started.
Follow this guide to get WinAVR setup and running on your computer and you should be ready to follow our next guide featuring a C Skeleton File.
Download and Install AVRStudio
First make sure that you have AVRStudio installed. AVRStudio is by Atmel, and it is the primary development environment for working with AVR microcontrollers. AVRStudio is hosted at atmel: Download Link Download and install AVRStudio with the default options. Note that it will install in C:\Program Files\Atmel\AVR Tools.
Download and Install WinAVR
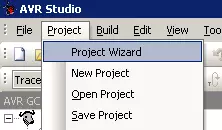
WinAVR (pronounced when-ever) is a free C compiler for the AVR series of microprocessors. It is the most widely used version of C for the AVR series, and lots of sample source code is available for use with it. WinAVR is hosted at sourceforge. Download Link Download and install WinAVR with the default options. Note that it will install in C:\WinAVR-20080610 (it will replace 20080610 with the date of the version that you installed) Now when you start AVRStudio, click on New Project and you should have a new project type listed called AVR GCC.
Fill out this form as completely as you can. I generally follow these design rules:
- All of my source code lives under c:\src\avr\project name
- I always name the directory and the project name the same
- My main code always lives in main.c
You should come up with a set of design rules that you follow to create a consistent source code setup. After you click Next you see this:
If you are just doing standard work in an STK500 or other development board, then choose AVR Simulator. The other choices are for more advanced simulations.
Pick your device from the list on the right. If you are not sure what device you are going to use, the ATmega32 is a good starting point; it's inexpensive, has lots of flash, EEPROM, I/O and timers. If you want to target a different chip you can always change it later. Click Finish. You will see a blank project. Let's set a couple more options now. Click on Project->Configuration Options:
We need to set the frequency that our chip is going to run at, so that we can use some built in macros to our advantage for timing. Here you can see that we have told the precompiler that we intend to run our chip at 8,000,000 hz, or 8Mhz.
If you get the error error: 'F_CPU' undeclared (first use in this function) when you compile, then you need to repeat this last step.
You are now ready to start writing C code for your AVR chip. Continue on to our next guide for an AVR based C skeleton file that will help jump start your project.